레이아웃 클래스는 ViewGroup 클래스의 상속을 받으며 내부에 무언가를 담는 용도로 사용된다.
종류는 리니어레이아웃, 렐러티브레이아웃, 테이블레이아웃, 그리드레이아웃, 프레임레이아웃이 있다.
가장 많이 사용되는 것은 리니어레이아웃이다.
가장 많이 사용되는 리니어레이아웃에 대해서 자세히 알아보고 나머지는 어떤 것들인지 알아놓기만 하자.
렐러티브레이아웃은 다른 위젯으로부터의 상대적인 위치를 지정하여 배치한다.
테이블레이아웃은 위젯을 행과 열의 개수를 지정한 테이블 형태로 배치 한다.
그리드레이아웃은 좌표를 이용하여 배치하고, 테이블레이아웃과 비슷하지만, 행 또는 열을 확장하여 배치할 수 있다.
프레임레이아웃 위젯들을 왼쪽 위에 일률적으로 겹쳐서 배치하여 중복해서 보이는 효과를 냄.
리니어레이아웃은 왼쪽 위부터 아래쪽 또는 오른쪽으로 차례대로 배치된다.
안드로이드 스튜디오에서 처음 프로젝트를 만들면 activity_main.xml 파일은 아래와 같다.
<?xml version="1.0" encoding="utf-8"?>
<androidx.constraintlayout.widget.ConstraintLayout xmlns:android="http://schemas.android.com/apk/res/android"
    xmlns:app="http://schemas.android.com/apk/res-auto"
    xmlns:tools="http://schemas.android.com/tools"
    android:layout_width="match_parent"
    android:layout_height="match_parent"
    tools:context=".MainActivity">

    <TextView
        android:layout_width="wrap_content"
        android:layout_height="wrap_content"
        android:text="Hello World!"
        app:layout_constraintBottom_toBottomOf="parent"
        app:layout_constraintLeft_toLeftOf="parent"
        app:layout_constraintRight_toRightOf="parent"
        app:layout_constraintTop_toTopOf="parent" />

</androidx.constraintlayout.widget.ConstraintLayout>
ConstrainLayout으로 지정이 되어있는데 LinearLayout으로 바꿔주자.
LinearLayout으로 바꾸기 위해서는 androidx.constraintlayout.widget.ConstraintLayout 이 부분을 LinearLayout 으로 바꿔주면 된다.
<?xml version="1.0" encoding="utf-8"?>
<LinearLayout xmlns:android="http://schemas.android.com/apk/res/android"
    xmlns:app="http://schemas.android.com/apk/res-auto"
    xmlns:tools="http://schemas.android.com/tools"
    android:layout_width="match_parent"
    android:layout_height="match_parent"
    tools:context=".MainActivity">

    <TextView
        android:layout_width="wrap_content"
        android:layout_height="wrap_content"
        android:text="Hello World!"
        app:layout_constraintBottom_toBottomOf="parent"
        app:layout_constraintLeft_toLeftOf="parent"
        app:layout_constraintRight_toRightOf="parent"
        app:layout_constraintTop_toTopOf="parent" />

</LinearLayout>
LinearLayout의 속성들에 대해서 알아보자.
먼저 orientation 속성이다.
편의를 위해 처음 xml파일 생성시 작성되어 있는 코드들은 생략하고 설명을 진행 하겠다.
<LinearLayout

       android:orientation="vertical"

    >

    <TextView
        android:layout_width="wrap_content"
        android:layout_height="wrap_content"
         />

</LinearLayout>
vertical , horizontal 2가지가 있는데 vertical은 위젯들이 왼쪽위에서 아래로 쌓이게 되고,
horizontal은 위젯들이 왼쪽위에서 오른쪽으로 쌓이게 된다.
두번째로는 gravity 속성이다.
gravity 속성은 다음과 같이 추가 할 수 있다.
<LinearLayout

       android:orientation="vertical"
       android:gravity="right|bottom"
    >

    <TextView
        android:layout_width="wrap_content"
        android:layout_height="wrap_content"
         />

</LinearLayout>
right를 넣게 되면 위젯들이 오른쪽으로 쏠리게 되고 bottom을 넣게되면 아래쪽으로 쏠리게 된다.
right와 bottom을 동시에 넣게되면 오른쪽 아래로 쏠리게 되고 right|bottom 과 같은 형식으로 쓰면 된다.
layout_gravity라는 속성도 있는데 gravity는 전체레이아웃의 위치를 결정하는 것이 였다면,
layout_gravity는 텍스트뷰, 이미지뷰, 버튼 등과 같은 위젯들의 위치를 정해준다.
아래과 같이 속성을 추가 할 수 있다.
<LinearLayout

       android:orientation="vertical"
       android:gravity="right|bottom"
    >

    <TextView
        android:layout_width="wrap_content"
        android:layout_height="wrap_content"
        android:layout_gravity="center"
         />

    <Button
        android:layout_width="match_parent"
        android:layout_height="wrap_content"
        android:layout_gravity="left"
        />

</LinearLayout>
세번째는 baselineAligned 속성이다.
baselineAligned 속성은 위젯들의 중앙선을 맞춰주는 속성이다.
true와 false 값 중 가질 수 있는데 생략을 하게되면 true값을 가진다.
이 속성을 false로 하면 다음과 같이 배치된 위젯을 다음과 같이 정렬 할 수 있다.

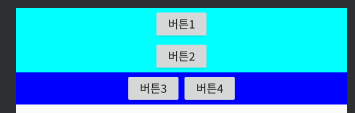
리니어레이아웃은 보기에는 자유도가 낮아보이고 제약이 많아 마음대로 화면구성을 하기 힘들 것 같지만,
리니어레이아웃은 중복해서 사용 할 수 있기 때문에 마음대로 화면 구성을 할 수 있다.
코드로 구현하면 다음과 같다.
<?xml version="1.0" encoding="utf-8"?>
<LinearLayout xmlns:android="http://schemas.android.com/apk/res/android"
    xmlns:app="http://schemas.android.com/apk/res-auto"
    xmlns:tools="http://schemas.android.com/tools"
    android:layout_width="match_parent"
    android:layout_height="match_parent"
    android:baselineAligned="false"
    android:orientation="vertical"
    tools:context=".MainActivity">

    <LinearLayout
        android:layout_width="match_parent"
        android:layout_height="wrap_content"
        android:background="#00ffff"
        android:gravity="center"
        android:orientation="vertical"
        >
        <Button
            android:layout_width="70dp"
            android:layout_height="40dp"
            android:text="버튼1" />

        <Button
            android:layout_width="70dp"
            android:layout_height="40dp"
            android:text="버튼2" />

    </LinearLayout>

    <LinearLayout
        android:layout_width="match_parent"
        android:layout_height="wrap_content"
        android:gravity="center"
        android:orientation="horizontal"
        android:background="#0000ff">
        <Button
            android:layout_width="70dp"
            android:layout_height="40dp"
            android:text="버튼3" />

        <Button
            android:layout_width="70dp"
            android:layout_height="40dp"
            android:text="버튼4" />

    </LinearLayout>


</LinearLayout>
layout_weight는 중복해서 사용 할 경우 비중을 결정해주는 속성이다.
2개의 LinearLayout에 이런 식으로 둘 다 1을 입력한다면 두 layout의 높이가 1:1, 즉 같아지게 된다.
<LinearLayout

>
	<LinearLayout
        android:layout_width="match_parent"
        android:layout_height="wrap_content"
        android:layout_weight="1"
        >
    </LinearLayout>

	<LinearLayout
        android:layout_width="match_parent"
        android:layout_height="wrap_content"
        android:layout_weight="1"
        >
     </LinearLayout>
</LinearLayout>
'컴퓨터 > 안드로이드' 카테고리의 다른 글
| [안드로이드] 대화상자(Dialog) 사용하기 (0) | 2020.04.21 |
|---|---|
| [안드로이드] 토스트(toast) 메시지 사용하기 (0) | 2020.04.21 |
| [안드로이드] xml을 이용해 컨텍스트 메뉴(ContextMenu) 사용하기 (0) | 2020.04.20 |
| [안드로이드] xml을 이용해 옵션메뉴(OptionMenu) 사용하기 (0) | 2020.04.20 |
| [안드로이드 스튜디오] eclipse 단축키 그대로 사용하는 방법 (0) | 2020.03.23 |


